안녕하세요 민희입니다.
HTML5의 <canvas>와 JavaScript를 활용해
간단한 드로잉 웹앱을 만들었습니다 🎨
🧩 구현된 기능
- 연필 / 수채화 브러시 / 지우개 도구
- 선 색상 선택
- 선 굵기 조절
- 전체 지우기 버튼
- 이미지 저장 기능 (새 탭에서 PNG로 보기)
- 모바일 터치 지원
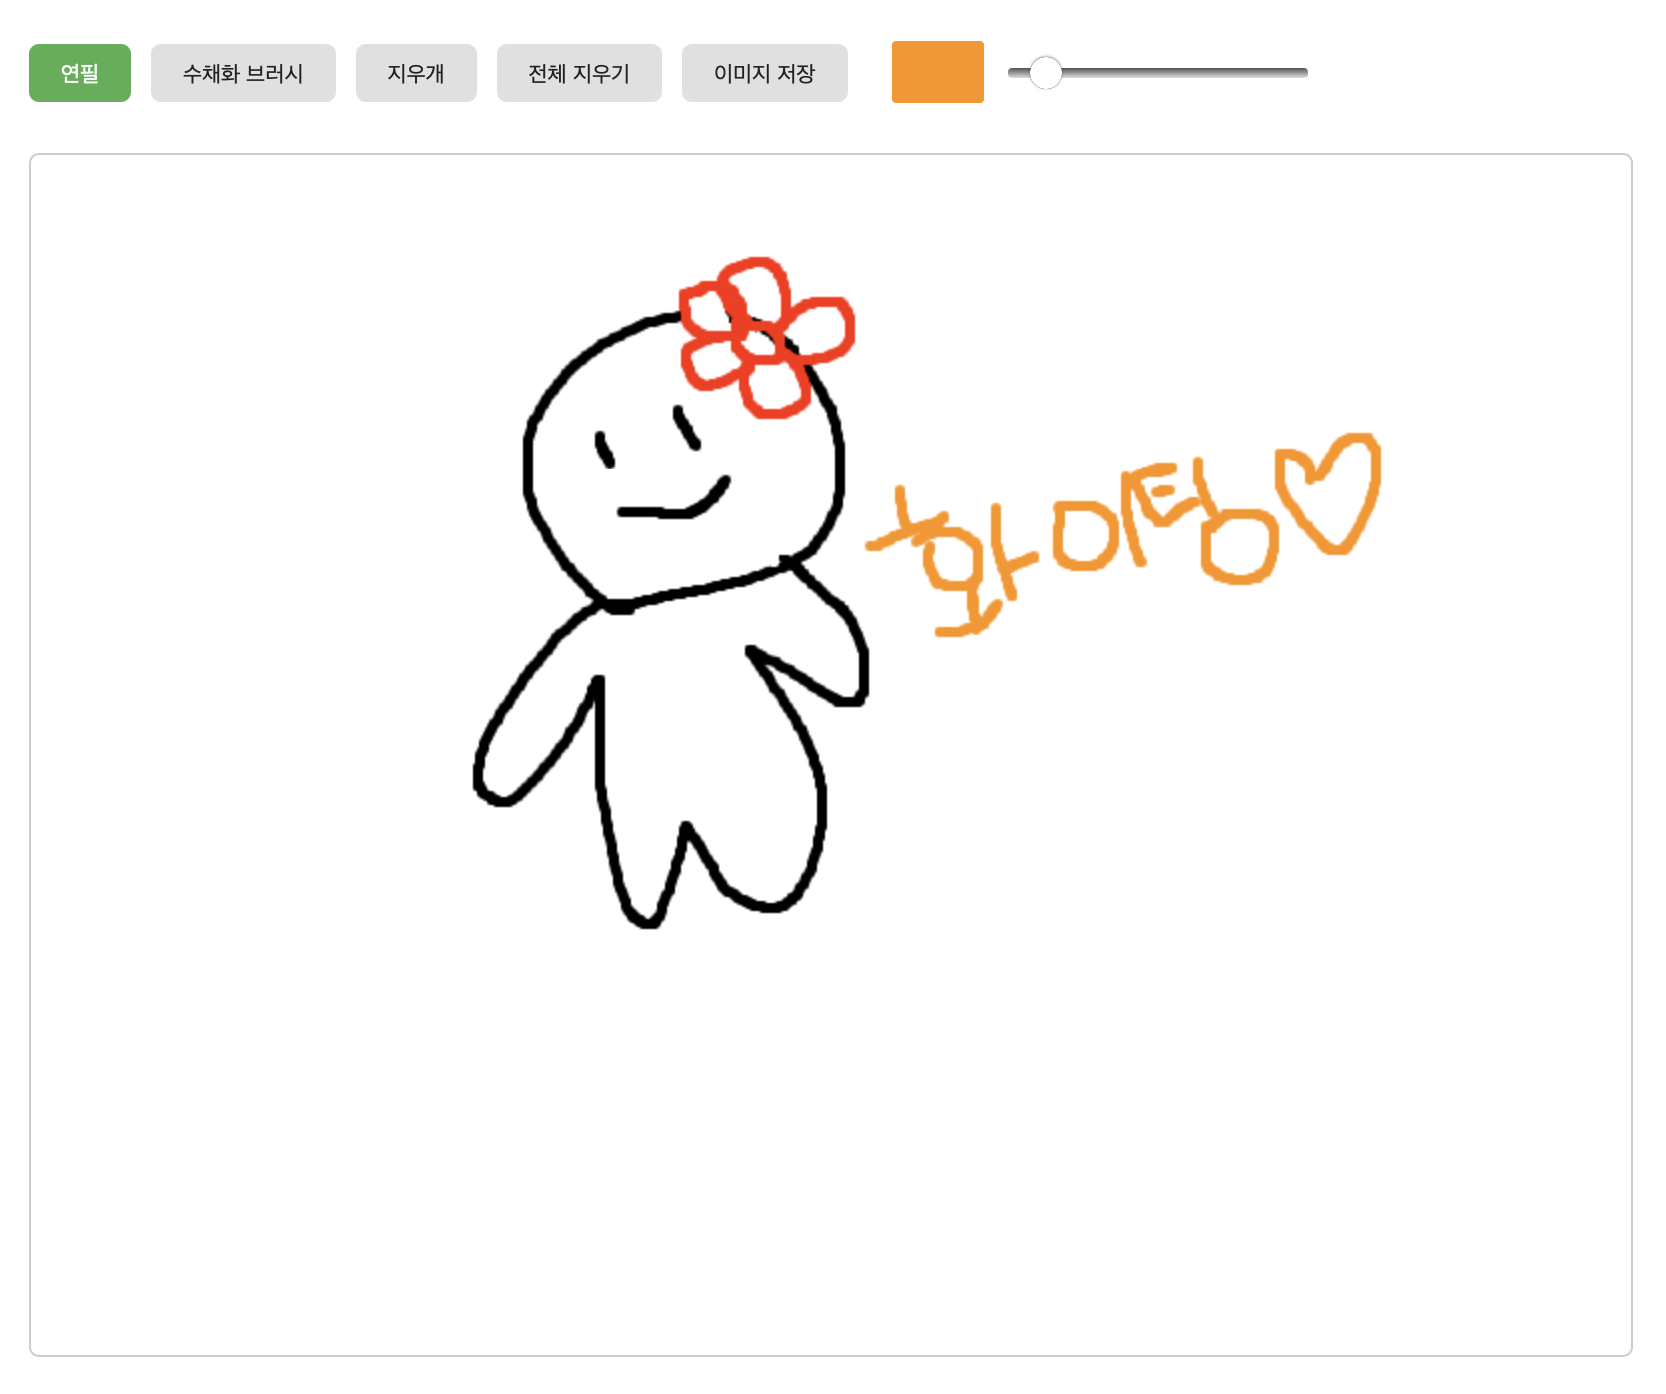
만든 웹앱으로 그려보았어요 :)
마우스와 노트북 터치패드 둘 다 작동하게 만들었구, 지금 마우스가 없어서 노트북 터치패드로 그렸어요 ^^;;
🏗 사용한 기술
- HTML5 Canvas
- CSS (버튼 및 레이아웃 디자인)
- JavaScript (마우스 & 터치 이벤트 처리, 그림 저장 기능)
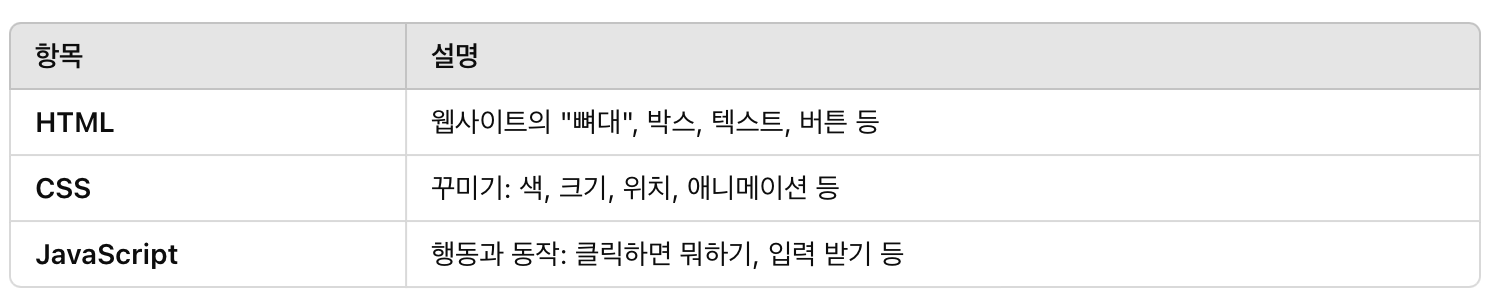
📌 HTML, CSS, JavaScript 구분
✨ 제가 CSS에 대해 잘 몰라서 공부 해 본 내용이에요
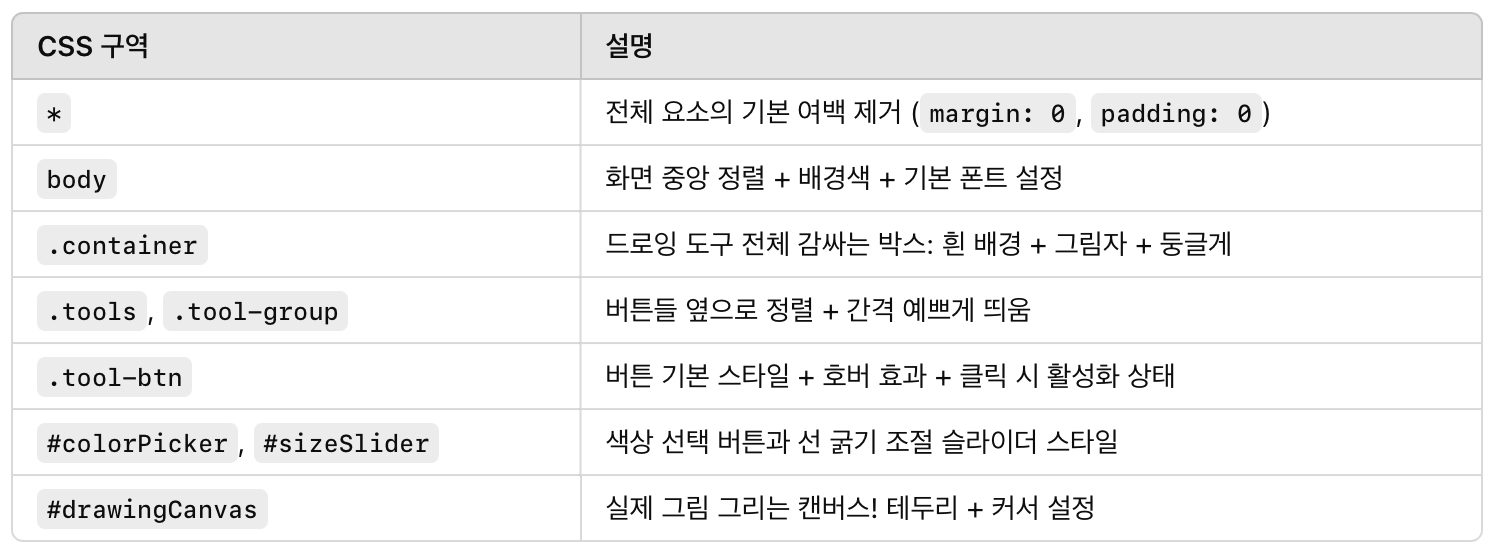
💡아래는 Cursor의 도움으로 작성 해 본 코드에요
[HTML 코드]
<!DOCTYPE html>
<html lang="ko">
<head>
    <meta charset="UTF-8">
    <meta name="viewport" content="width=device-width, initial-scale=1.0">
    <title>드로잉 웹앱</title>
    <link rel="stylesheet" href="styles.css">
</head>
<body>
    <div class="container">
        <div class="tools">
            <div class="tool-group">
                <button id="pencil" class="tool-btn active">연필</button>
                <button id="brush" class="tool-btn">수채화 브러시</button>
                <button id="eraser" class="tool-btn">지우개</button>
                <button id="clear" class="tool-btn">전체 지우기</button>
                <button id="save" class="tool-btn">이미지 저장</button>
            </div>
            <div class="tool-group">
                <input type="color" id="colorPicker" value="#000000">
                <input type="range" id="sizeSlider" min="1" max="50" value="5">
            </div>
        </div>
        <canvas id="drawingCanvas"></canvas>
    </div>
    <script src="script.js"></script>
</body>
</html>
[CSS 코드]
* {
    margin: 0;
    padding: 0;
    box-sizing: border-box;
}

body {
    display: flex;
    justify-content: center;
    align-items: center;
    min-height: 100vh;
    background-color: #f0f0f0;
    font-family: Arial, sans-serif;
}

.container {
    background-color: white;
    padding: 20px;
    border-radius: 10px;
    box-shadow: 0 0 10px rgba(0, 0, 0, 0.1);
}

.tools {
    margin-bottom: 20px;
    display: flex;
    gap: 20px;
    align-items: center;
}

.tool-group {
    display: flex;
    gap: 10px;
}

.tool-btn {
    padding: 8px 16px;
    border: none;
    border-radius: 5px;
    background-color: #e0e0e0;
    cursor: pointer;
    transition: background-color 0.3s;
}

.tool-btn:hover {
    background-color: #d0d0d0;
}

.tool-btn.active {
    background-color: #4CAF50;
    color: white;
}

#colorPicker {
    width: 50px;
    height: 40px;
    padding: 0;
    border: none;
    border-radius: 5px;
    cursor: pointer;
}

#sizeSlider {
    width: 150px;
}

#drawingCanvas {
    border: 1px solid #ccc;
    border-radius: 5px;
    cursor: crosshair;
}
[JAVA Script 코드]
const canvas = document.getElementById('drawingCanvas');
const ctx = canvas.getContext('2d');
const tools = document.querySelectorAll('.tool-btn');
const colorPicker = document.getElementById('colorPicker');
const sizeSlider = document.getElementById('sizeSlider');

canvas.width = 800;
canvas.height = 600;

let isDrawing = false;
let currentTool = 'pencil';
let currentColor = '#000000';
let currentSize = 5;
let lastX = 0;
let lastY = 0;

tools.forEach(tool => {
    tool.addEventListener('click', () => {
        tools.forEach(t => t.classList.remove('active'));
        tool.classList.add('active');
        currentTool = tool.id;
    });
});

colorPicker.addEventListener('input', (e) => {
    currentColor = e.target.value;
});

sizeSlider.addEventListener('input', (e) => {
    currentSize = e.target.value;
});

document.getElementById('clear').addEventListener('click', () => {
    ctx.clearRect(0, 0, canvas.width, canvas.height);
});

document.getElementById('save').addEventListener('click', () => {
    const image = canvas.toDataURL('image/png');
    const newWindow = window.open();
    newWindow.document.write(`
        <html>
            <head>
                <title>그림 저장</title>
                <style>
                    body { display: flex; flex-direction: column; align-items: center; justify-content: center; height: 100vh; margin: 0; background: #f0f0f0; font-family: Arial, sans-serif; }
                    img { max-width: 100%; max-height: 80vh; margin-bottom: 20px; }
                    .instructions { text-align: center; margin-bottom: 20px; padding: 10px; background: white; border-radius: 5px; box-shadow: 0 2px 5px rgba(0,0,0,0.1); }
                </style>
            </head>
            <body>
                <div class="instructions">
                    <h2>이미지를 저장하는 방법</h2>
                    <p>1. 이미지 위에서 마우스 오른쪽 버튼을 클릭하세요</p>
                    <p>2. "이미지를 다른 이름으로 저장"을 선택하세요</p>
                    <p>3. 저장 위치를 선택하고 파일명을 정하세요</p>
                </div>
                <img src="${image}" alt="그림">
            </body>
        </html>
    `);
});

canvas.addEventListener('mousedown', startDrawing);
canvas.addEventListener('mousemove', draw);
canvas.addEventListener('mouseup', stopDrawing);
canvas.addEventListener('mouseout', stopDrawing);

canvas.addEventListener('touchstart', handleTouch);
canvas.addEventListener('touchmove', handleTouch);
canvas.addEventListener('touchend', stopDrawing);

function startDrawing(e) {
    isDrawing = true;
    [lastX, lastY] = getCoordinates(e);
}

function draw(e) {
    if (!isDrawing) return;

    const [currentX, currentY] = getCoordinates(e);

    ctx.beginPath();
    ctx.moveTo(lastX, lastY);
    ctx.lineTo(currentX, currentY);

    ctx.strokeStyle = currentTool === 'eraser' ? '#ffffff' : currentColor;
    ctx.lineWidth = currentSize;

    if (currentTool === 'brush') {
        ctx.lineCap = 'round';
        ctx.lineJoin = 'round';
        ctx.globalAlpha = 0.3;
        ctx.lineWidth = currentSize * 1.5;
    } else {
        ctx.lineCap = 'round';
        ctx.lineJoin = 'round';
        ctx.globalAlpha = 1.0;
    }

    ctx.stroke();
    [lastX, lastY] = [currentX, currentY];
}

function stopDrawing() {
    isDrawing = false;
}

function getCoordinates(e) {
    const rect = canvas.getBoundingClientRect();
    if (e.type.includes('touch')) {
        const touch = e.touches[0];
        return [touch.clientX - rect.left, touch.clientY - rect.top];
    }
    return [e.clientX - rect.left, e.clientY - rect.top];
}

function handleTouch(e) {
    e.preventDefault();
    if (e.type === 'touchstart') {
        startDrawing(e);
    } else if (e.type === 'touchmove') {
        draw(e);
    }
}
깃허브에도 공유 해 두었고, 추가 되는 기능들은 깃허브에 업데이트 할 예정입니다!^^
[깃허브 URL]
https://github.com/minhee0830/Drawing-Web-App
저는 이렇게 Cursor의 도움으로 짠 코드를 바탕으로 chat GPT에게 해당 코드를 한 줄씩 설명 해 달라고 합니다.
그러면서 공부를 해 나가고 있어요.
다른 초보자분들은 어떻게 공부하고 계신지 궁금하네요 :)
또 다른 이야기로 돌아올게요 ^^!
'📘 프로젝트 기록' 카테고리의 다른 글
| 직접만든 100% 무료 PDF병합, 이미지 누끼 따기, 이미지 사이즈 조절, 이미지 확장자변경 웹사이트 소개 (0) | 2025.05.02 |
|---|---|
| Python으로 만든 PDF 합치기 프로그램 (macOS용 앱 다운로드 제공) (0) | 2025.04.03 |
| [Cursor AI 후기] AI와 함께 테트리스 게임 만들기 🎮 (0) | 2025.03.30 |


